When I first saw the Anza Brutalist espresso machine, I was in love. I followed the machine through its kickstarter (I don't do kickstarter anymore after getting ripped off several times) until it went into full production and then
splurged on one. It's gorgeous, and it makes a great cup of espresso. Now that I've become more of an espresso snob, I can lightly lament the lack of a second boiler and the slightly awkward frother, but for the intersection of serious espresso and serious design, this machine can't be beat.
However perfect, the machine does have some issues. One issue is the water tank located at the rear. It's made of glass, as it probably should be, but it's mighty thin glass (read: delicate). In fact, it's a bit of a surprise that the glass survives transit without shattering. One vigorous push of the machine toward the back wall, and CRASH! And, indeed, that is what happened with our machine.
I wrote to the Anza folks, and they swiftly sent me a new water tank for $90. You can now find replacement tanks at their web page for the same cost. However, there are no instruction anywhere on how to replace the tank. An email to Anza resulted in a promise of instructions, but then Anza went radio silent despite several pleas for help.
After using the broken tank for over a year (with the replacement tank sitting next to it), I finally decided to try and fix the tank. At first, I was frustrated by how the thing was attached at the top. I hadn't seen a fastener like this before and had no idea how it worked. I then investigated hiring a professional, but that was going to start at $254 an hour will no guarantee of success given that this is a boutique machine. So, inspired by my cheapness, I tackled it again and, lo and behold, figured it out. I document the fix here so others can have hope of replacing their own water tank.
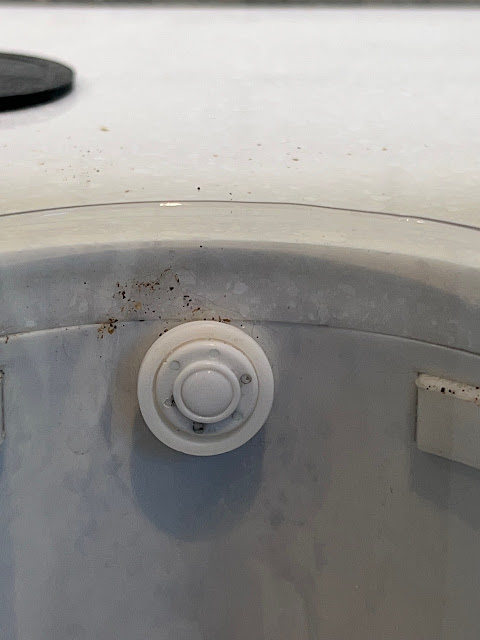
The hardest part was figuring out the top fastener. It looked like a clip, but after pulling on the tank, pressing on the center of the fastener and prying on its edges in various ways, I had no luck. But then a lucky slip of a tiny flat-head screwdriver revealed that the gooey center of the fastener was a rubber plug covering a hidden screw! With that discovery, I was on my way!

That grunge you see is on the outside of the tank. What a wacky-looking fastener!
With that damn rubber plug out, you can then unscrew the hard plastic "ring." Our break in the glass was conveniently opposite the fastener, so it was easy to remove the screw. If your break wasn't that convenient, then you need to find a stubby screwdriver or an angled one to remove (and then replace) the screw. Either that, or provide a better "break"!
The next step to remove the tank from the machine is to remove the four screws from the bottom of the tank cradle.
It takes a wee bit of tugging to and fro to remove the tank assembly from the cradle, but, alas, here it comes!
I was able to pull the zip tie from the hose and then pull the hose off the nipple to fully disengage the tank. Of course, you should make sure the tank doesn't have water in it beforehand.
I cut off the zip tie, reattached the hose to the nipple, and then placed the new tank into the cradle, ensuring that the tank "feet" (there are three of them) went into the right receptacles in the cradle. I had to gently but firmly press down on the tank to get it to fully settle into the cradle and for the screw hole for the top fastener to line up properly. I first got the screw for the upper attachment started before screwing in the bottom screws. With the water tank fully screwed into the cradle, I returned topside to fully seat the upper screw.
It's a real pain the patootie to screw that top screw in with an unbroken tank because you can't get a straight shot at the screw from the side. If I had to do it all over again, I would try to use a ratchet with a Philips head attachment. However, you'll need a long, thin attachment to be able to use the ratchet for the full seating given how deeply set the screw is in the fastener. If you do this, be sure to place a washcloth around the edge of the glass tank so you don't break it (which would be a serious bummer at this point in the process).
Good luck (and good espresso making!).