
"There is it!" I yelped as I yanked the rented Tourag to the side of the road and jumped out of the car. I rushed to the center of the street, hand-leveled my camera, and pressed click.
"Hey!" a uniformed officer yelled. He came running out of the bushes to my right. "What are you doing!"
"I'm taking a photo of this house," I replied.
"Where are you from?" he asked.
We pulled out our passports and driver licenses and explained that we were from Texas.
"Then why does your car have German plates?"
I could have been a smart ass at this point ("'cause I left my trusty steed in Muleshoe..."), but just simply answered, "It's a rental."
After several more questions, he asked why I wanted a photo of the building.
I cleared my throat. I explained that the building was architecturally important, one of the key works by Austrian-architect Adolf Loos. I explained how Loos was an architectural radical who wrote "Ornament and Crime" and was nearly tarred and feathered for the design of the Looshaus in downtown Vienna. I explained how he played a critical role in Modernism in architecture and how he radicalized Rudolph Schindler and Richard Neutra.
"We're touring a bunch of his buildings. We're calling it Loos-apalooza!"
He wasn't impressed.
"We call it the Monkeyhaus," he deadpanned.
"Monkeyhaus?" I replied.
"Yes," he said. "It looks like a monkey."
We both turned and contemplated the facade. "It does look like a monkey," I conceded.
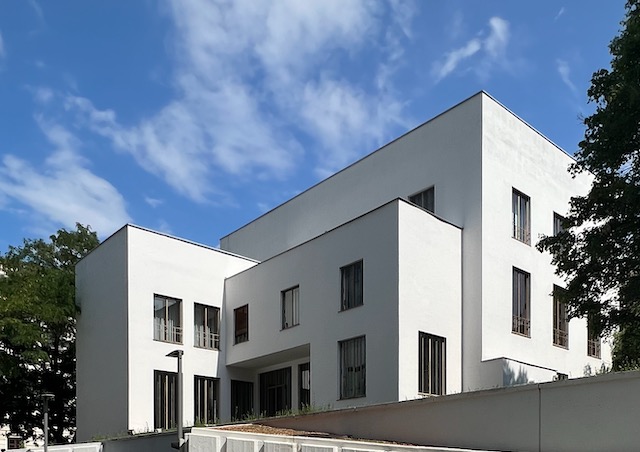
As it turns out, Villa Moller (1929-30) now serves as Israel's embassy in Austria (I can only imagine the security these days...). I had forgotten that and the stories from other Loosheads that had stopped to gawk and take photos and then been accosted by armed guards, some demanding the photos be deleted. Fortunately, he didn't ask to see my phone (there's an embarrassing number of cat photos on there) or ask me to delete the photo I took. And thank goodness that the single shot I was able to get off was magnificent.
ooo! ooo!
aah! aah!
-----------------------------------
One of Loos' most famous designs is for what is now named the Looshaus in downtown Vienna on the Michaelerplatz. There's a lot to see on the Michaelerplatz in addition to the Looshaus: the historic St. Michael's Church, Roman ruins exposed in the street, the Hofburg Palace, and the Sisi Museum. The busloads of international tourists gawked in all directions except the Looshaus, the most important building on the plaza, at least architecturally.
The Looshaus looks, to today's eyes, rather pedestrian, like a sexxed up Hampton Inn. But when it was completed in 1912, it was consider off-the-hook radical due to its lack of ornamentation. Yes, Loos employed columns (a nod to the cathedral next door) and cornices and, in places, medallions, but the decoration on the bottom half of the building came almost entirely from the richness of Cipollino marble. On the upper half, the windows are naked except for occasional flower boxes.
About those windows... When it became clear during construction that the windows on the upper half had no ornamentation, the press attacked, describing the building as inappropriately naked. Loos gave a public speech at the construction site to defend his design, but the city pulled the building permit until Loos changed the design. Begrudgingly, he agreed to add a fig leaf of flower boxes, and construction continued. The Emperor disliked the Looshaus so much that he ordered curtains for that side of the palace to be permanently closed so he didn't have to look at it.
Loos was inspired by Louis Sullivan in Chicago and advanced his work. Arguably, Loos' windows were inspired by Chicago-style windows, which are triptychs of glass.


Haus Wittgenstein (1929) in Vienna is a Loos-esque house designed by Paul Engelmann. Wittenstein gets co-credit due to his designs of various fixtures in the house and being a general pain-in-the-ass during construction, once demanding a ceiling be raised 30 mm to meet plans. The building also serves as part of the Bulgarian embassy, but we were able to tour much of the interior along with a retired materials engineer (The Bride's profession). The house has the classic Loos massing, but the interiors are bright and airy, unlike the heavier touch of Loos.


Loos was born and raised in Brno, Czechia, so we stopped in to visit a sculpture placed in his honor by the city whilst checking out Mies van der Rohe's Villa Tugendhat nearby.