6.18.2023

another neighborly scrape

So the place right next to us is coming along nicely. We miss the trees and seeing them out our windows, but we're planting to overcome the changes and fill in the gaps. After all, we knew that it was only a matter of time before the place next door was leveled and a new place built. On balance, we feel fortunate because we can still see the sky since most of the place is single storied. And it's a cool, MCM-ish place.


But now the place next to it has been sold and leveled with new construction on the way. 

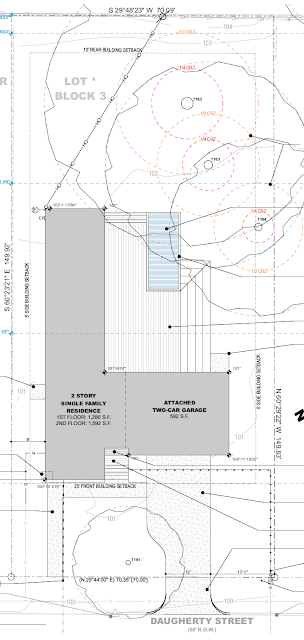
This house will be 2,877 sq-ft two-story (1,286 sq-ft first story, 1,591 second story) with an attached two-car garage and a pool and is, interestingly enough, a modular house (which explains its slightly awkward floor plan).

This is a spec home with the developer and builder (!!!) out of California. The developer is Palladium Development & Desert Construction, which has no interweb footprint that I can find beyond the developer's Linkedin profile. The local agent is Site Specifics (which oddly made some rookie mistakes with the permit application). The local architect is Alfredo Terrones with mmry and an email hooked up to a web address that is available for purchase (although he does have a bad-ass photo up at Linkedin).

The modules will be built off-site by Impresa Building Systems out of Greenwood, South Carolina. 

Here's the site plan:


So it doesn't cover most of the site (30 percent according to the plans) and has some healthy setbacks from the property lines. 

street perspective:


so it's Farmhouse Modern in style.

first-floor floorplan:


This floorplan was my first clue that this was a modular home. The entry to the house is particularly unceremonious for a custom build: a tiny foyer that empties into a hallway. If your sight is better than mine, the text on the side says (MODULE A, MODULE B [something I just noticed!]). That's one helluva deck! Given the southern exposure, the homeowners are going to be cooked, at least until some trees come in.

Here's the second story:


Second-story masters are rare, so there's that (the master closet is mislabeled laundry). There's also an outside, second-story terrace over first-floor living space and the garage.

Elevations:

You can see where the elevation busts McMansion on the eave to the left. Our house stayed within the envelope, but the builder was so worried we would accidentally bust it that he shifted the entire house a couple feet to the north. Because this is an eave, I think they are OK (but they need to watch that roofline; however, it looks to me that the setbacks are not correctly considered).


The elevation below shows a major violation of McMansion. What's strange is: why is this part of the house inside the envelope from the front but not from the back? It looks like an error on placing the envelope on this elevation. The building is setback from the southern side of the property by ~15 feet while it's setback by ~10 feet on the northern side. This elevation only shows ~5 ft for the southern side. If they used the correct setbacks, the place would be completely inside the McMansion envelope. They should probably shift the place a few feet to the south to get some room for error on the eave. If they build too high, they'll be in trouble with McMansion and will have to shave part of the building off.
 

Another interesting thing about this house is that it will be on pier and beam. First new construction in the hood to see this!

And there you have it! Surprised to see a smallish place go in on the street given such a large lot (>10,000 ft). They are leaving $$ on the table. On the other hand, this is probably a quick and dirty build, especially with the developer out of California. Easy in, easy out!

6.04.2023

regrets, we have a few...


When you build, there are always design and build regrets, so here are the ones we have for the cabin. Lemme stress that we freakin' LOVE the cabin and in no way shape or form are these fatal regrets or say anything about the designers and builders. Building a house, a cabin, or anything, really, is a human endeavor wracked with hundreds of decisions by dozens of people. I offer these as something for you, dear readers, to consider as you move forward in your own projects, as well as for us if we ever build again (we're getting older, but may have one more project in us). Many of these are pretty minor or, if things went the other way, they would still be listed here (because we'd be thinking the other way may have been better). In reality, this is a remarkably short list. 


1. The backsplash: Due to a miscommunication, the countertop material did not make it up the walls for the backsplash. Once I realized what had happened, I was told that the material was no longer available (hmmmm...). The regret is that I should have pushed on this. I agreed for the tile that went in, but the color is off (although oddly, in this photo, it doesn;t look too bad!). Admittedly, once all our stuff occupied the space, the difference is less visible, but I still notice it. Every. Damn. Time. I still may fix this sometime in the nearish future.


2. The sliding door height: It would have been better for these doors to be taller and match the height of the top windows. The Baby Architect has mentioned this as a design regret. Of course, taller means more bucks (and the mo money may have been formidable), but we didn't discuss it. Not fatal: the space is still remarkable. It just could have been more remarkabler.


3. More translucence: That top translucent bit is a fave detail of the architect. I've wondered if it should have run down the wall twice the length it does. That added length would have tied the bottom to the top of the other windows and the entry door (and let more light in).


4. The plug disaster: Oops.


5. Back in black fireplace: When choosing tile for the fireplace, I went back and forth (and back and forth) about what color to make the volume that contains the fireplace. Ultimately, I went with a light grey tile to accentuate the linear fireplace. But considering the space as a whole (and the black cabs in the kitchen), I'm now thinking black would have been better. This is also one of those deals that if we had gone with black, I would be posting right about now about now about how we maybe should have gone light. 


6. Pillars of Damascus: The internal casing width on these windows was a bit of a shock when I first saw them. Essentially, the window manufacturer cheeseballs their casements together resulting in a pillar three times the thickness they should be. Once it was done, nothing could be done (at least not without substantial cost).

7. White (or black) casements: We also went back and forth on whether or not the casements should be black or white and went (obviously) with white. White works on the interior, but on the exterior, they don't quite look right. Once reason is because the stucco has a hint of brown to it creating enough of a contrast with the windows to be visually irritating. On the other hand, I'm not sure how great black would have worked on the interior. Regardless, if we had to do it all over again, I'd go black.


8. Fat fridge: I really despise how fridges dominate kitchens. Because the cabin is small, we didn't have the option of sliding the fridge into a side pantry. Originally, we had a bump-out in the back wall (similar to our current house) to slide a regular fridge in to be counter depth, but that disappeared after a revision to the plans. So we went with it and went with a more expensive counter depth fridge. But somehow (and for some reason) the damn thing sticks out four extra inches it shouldn't. Sigh.


9. Hidden, but...: Another thing I despise in a kitchen are exposed trash and recycling bins. So we spec'd that these be hidden in our kitchen and wanted something like we have in our house (I provided photos) where you pull on a drawer and out comes the trash bin. On the plus side, we have the hidden cans, but we have to first pull open a door and then pull on the can to slide it out. Minor inconvenience, but immensely irritating nonetheless.


10. Sticky-outy washies: Wished we had spec'd the room to be a little wider behind the washer-dryer to push them back flush with that wall. Cleaner look; more space.


11. Longer washer window: I requested a window in the laundry room for (1) natural light in the room and (2), more importantly, creating an outdoor vanishing point for walking down the hallway (being able to see farther than the wall makes a place feel a lot larger than it actually is). We got that, but, after seeing the window installed, I really wish the window ran down closer to the floor.


12. Fatter bathroom window: I also asked for the horizontal window in the bathroom. One of the moments I love in our Austin house is the ability to look out the shower and see the sky and trees. However, in this case, because the widow is so high, I can only see a sliver. If I had to do it all over again, I would double the height (maybe a little more) of that window. In retrospect, I should requested elevations of these inside walls, something I was not able to imagine. The exterior elevations looked great with this window and the previous one, but it didn't allow me to see how they would work on the interior. 


13. Where art thou, shower control: One thing we didn't think about with the walk-in shower was where to optimally place the shower control. As is, you have to step in and turn it on and then quickly retreat, ducking the ice cold water avalanching from above. The controller should have been on the right side of the back wall (with the chevrons) in the photo above so you can turn it on without having your libido smothered. We've got it figured out (reach, turn it on, run!), so no need to feel sorry for us. But as we get older, we'll get slower, so it could be a bit of a challenge.


14. Bathroom wall width: I pointed out some issues with the final plans, including the fact that the plans showed the bathroom cabinet extended past the door jam. It wasn't addressed. I think architects and builders reach a point where they are sick of their client pointing stuff out and therefore simply ignore you (this happened on the Austin house as well). Well, lo and behold, the builder and cabinet maker followed the plans to the T and the cabinet had to be shifted to the left to work.


15. Pooping off-center: However, the cabinet shift created an unexpected issue with the toilet, which is now off-centered (aesthetics) and a little cramped on the left (pooping) side (functionality). Sigh.


16. Not-quite-black slate: Freakin' love the slate floors (the architect's suggestion). Adds a little organic to the modern, but I wish the slate was as goth as it appeared in the photos. In retrospect, I should have asked for samples before making a decision (although we were in a pinch for time at the time). Regardless, it's really nice and we're good with it. 


17. More rainwater, please: The original plans for the bottom floor (walk-out basement) only had room for one 2,500 gallon tank to store rainwater. However, during digging of the foundation, the builder substantially bumped out the basement to include the entire footprint of the cabin. We're wishing that we'd use that opportunity to add another (maybe two?) more tanks. A volume of 2,500 gallons is pretty small for resilient rainwater harvesting for two people. Cloudcroft's annual rainfall is similar to Austin's, and a home in Austin requires 20,000 gallons of storage for a resilient (get through the drought of record) supply. The current tank may be enough during the summer months when local water stress is at its highest (the local population doubles) and rainfalls are daily with the monsoon season. To add a tank (or multiple tanks) now would require tearing a big ole hole in a stucco'd wall. We may do this at some point to help out the village (and perhaps avoid the treated wastewater supply).


18: Square window: In retrospect, I wish we'd put a small square window in the primary closet. We have one in our Austin home, and it's lovely.


19. Side window in second bedroom: Wishing we had put a window in that wall, near the paintings above the sofa. Windows on two sides do a lot to expand a space and make it feel better. I couldn't tell how the land surface intersected with the foundation during the design, but that wall over yonder is fully exposed.

20. Plugs in the second closet: Oddly, we have no plugs in this enormous closet.


Again, we are over the roof in love with the place: it's aesthetics, it's embracing of the forest, it's feel and function, it's future in our lives. We had hopes and dreams for the cabin, and they have been far exceeded. Accordingly, we heartily recommend the architect and builder.

4.30.2023

replacing the water tank on the anza espresso machine

When I first saw the Anza Brutalist espresso machine, I was in love. I followed the machine through its kickstarter (I don't do kickstarter anymore after getting ripped off several times) until it went into full production and then splurged on one. It's gorgeous, and it makes a great cup of espresso. Now that I've become more of an espresso snob, I can lightly lament the lack of a second boiler and the slightly awkward frother, but for the intersection of serious espresso and serious design, this machine can't be beat.

However perfect, the machine does have some issues. One issue is the water tank located at the rear. It's made of glass, as it probably should be, but it's mighty thin glass (read: delicate). In fact, it's a bit of a surprise that the glass survives transit without shattering. One vigorous push of the machine toward the back wall, and CRASH! And, indeed, that is what happened with our machine.

I wrote to the Anza folks, and they swiftly sent me a new water tank for $90. You can now find replacement tanks at their web page for the same cost. However, there are no instruction anywhere on how to replace the tank. An email to Anza resulted in a promise of instructions, but then Anza went radio silent despite several pleas for help.

After using the broken tank for over a year (with the replacement tank sitting next to it), I finally decided to try and fix the tank. At first, I was frustrated by how the thing was attached at the top. I hadn't seen a fastener like this before and had no idea how it worked. I then investigated hiring a professional, but that was going to start at $254 an hour will no guarantee of success given that this is a boutique machine. So, inspired by my cheapness, I tackled it again and, lo and behold, figured it out. I document the fix here so others can have hope of replacing their own water tank.

 
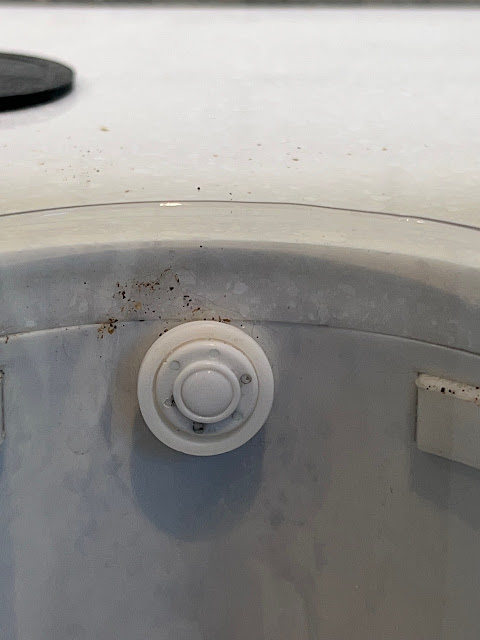
The hardest part was figuring out the top fastener. It looked like a clip, but after pulling on the tank, pressing on the center of the fastener and prying on its edges in various ways, I had no luck. But then a lucky slip of a tiny flat-head screwdriver revealed that the gooey center of the fastener was a rubber plug covering a hidden screw! With that discovery, I was on my way! 


That grunge you see is on the outside of the tank. What a wacky-looking fastener!


With that damn rubber plug out, you can then unscrew the hard plastic "ring." Our break in the glass was conveniently opposite the fastener, so it was easy to remove the screw. If your break wasn't that convenient, then you need to find a stubby screwdriver or an angled one to remove (and then replace) the screw. Either that, or provide a better "break"!


The next step to remove the tank from the machine is to remove the four screws from the bottom of the tank cradle.


It takes a wee bit of tugging to and fro to remove the tank assembly from the cradle, but, alas, here it comes!


I was able to pull the zip tie from the hose and then pull the hose off the nipple to fully disengage the tank. Of course, you should make sure the tank doesn't have water in it beforehand. 
 
I cut off the zip tie, reattached the hose to the nipple, and then placed the new tank into the cradle, ensuring that the tank "feet" (there are three of them) went into the right receptacles in the cradle. I had to gently but firmly press down on the tank to get it to fully settle into the cradle and for the screw hole for the top fastener to line up properly. I first got the screw for the upper attachment started before screwing in the bottom screws. With the water tank fully screwed into the cradle, I returned topside to fully seat the upper screw.  
 
It's a real pain the patootie to screw that top screw in with an unbroken tank because you can't get a straight shot at the screw from the side. If I had to do it all over again, I would try to use a ratchet with a Philips head attachment. However, you'll need a long, thin attachment to be able to use the ratchet for the full seating given how deeply set the screw is in the fastener. If you do this, be sure to place a washcloth around the edge of the glass tank so you don't break it (which would be a serious bummer at this point in the process).


And there you have it! 

Good luck (and good espresso making!).

4.02.2023

pooperpumper pumping!


On our last trip to the cabin in February, we discovered that the sewer pipe had frozen. 

Say what?

We've heard of water pipes freezing, but sewer pipes? Yep: it's possible.

The cabin sits below the grade of the city sewer line. That means we have to pipe that poop uphill into the sewer. That requires a pooperpumper, a grinder pump in the basement, to grind and then pump that poop uphill into the sewer. Part of the plumbing involves a check valve that, upon the pooperpumper emptying the poop sump, the pump stops, the water in the pipe begins to reverse flow, and the check valve closes, preventing the poopwater in the pipe from sloshing back into the sump. That prevents triggering the pump to cycle over and over and also, I imagine, keeps sewer gases from seeping back into the house. However, it also keeps the pipe full of poopwater. Without a steady stream of new steamers, the pipe can freeze.

Theoretically, the pipe should be buried deep enough (below the frost line) to not have to worry about this, but the sewer line is shallow (~2 feet) at the street (and it is oftentimes exposed going down the hill after major rain events) and therefore more susceptible to freezing.

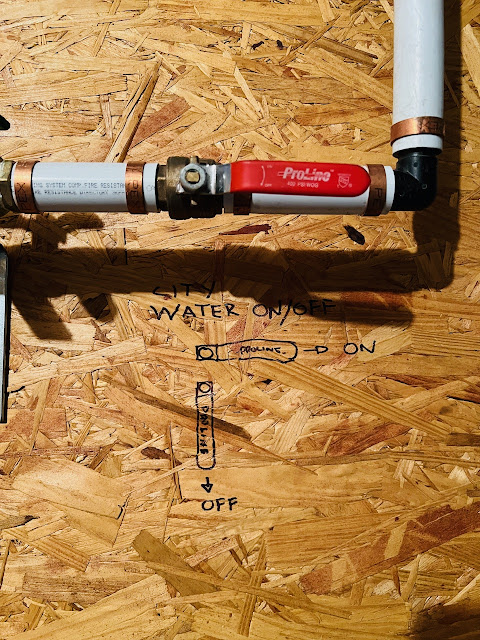
To solve this, the plumber installed a side valve that allows us to turn the pooperpumper off and then drain this pipe before we leave or when we winterize the place. When we come back, we can then turn the pooperpumper on and be on our way.

This is a bit of a drag since guests will have to do this on the fringe-of-winter months. We did find an awesome housekeeper that will be able to handle this (and she keeps the whole house). We should also be able to connect up a smart plug to be able to turn the pooperpumper on and off remotely, but we won't be able to open and close the valve remotely, at least not with more plumbing work. Regardless, it's all working again. 

I feel like we need to stay there a few more times to work out the bugs before turning it over to guests. One thing is clear: Although it's glorious to stay up there during the winter months, it sure is challenging with the driveway, the pipes, the snow and ice on the roof, and whatnot.

3.04.2023

wintry upgrades


We flew out to the Cloudhaus with a long list of honeydo upgrades we wanted to do. At the top of the list was upgrading lightswitches and plugs before the architect had a photographer come and shoot the place. Also on the list was putting in keycode access to the front door and upgrading screws to the hooks in the laundry room.

The first surprise was how much snow was in the driveway. Like three feet worth in places. Paid a guy to mini-doze the drive, but he didn't get down to the base because there was about three inches of ice at the bottom (thank you freeze-thaw!). So we had to park at the top, hugging the approach so as not to block in the neighbors. May try to put in a street-level parking spot topside.  


The second surprise was the lack of water. I'd been keeping the place at 50 during our absence in hopes that would be enough to keep the pipes from freezing. After letting the place warm up a bit with no luck, I texted the builder to see if he had any ideas. "Oh geez!" he said, and he rushed over. Turned out he had turned the water off! That was good news!

The third surprise was the pooperpumper alarm going off. Turned out that the sewer line had frozen! Normally that would not happen because normally sewer lines are gravity fed. In our case, because we have a pooperpumper, the poop line goes uphill to the sewer line. And a valve at the house activates once the flow reverses when the pump stops pumping dat poo. Anywho, without a steady supply of warm steamers, the poopjuice done froze. The line is only about 28 inches down at the street at our house and less deep as it heads down the road (it's sometimes exposed [!!!] during high-runoff events, so the sewer can get cold). It's fixed now with a valve to drain the pooppumper pipe when we're not there during the cold season.

The fourth (good) surprise was meeting someone to watch, take care of, and clean the cabin. 

As we learn about mountain living, several take-aways were (1) we need a real four-wheel-drive and (2) we need to leave the place winterized during the winters and not have any guests. It's too complicated and challenging unless someone really knows what they are doing.

I was able to replace all of the plugs topside during the trip, and they look sharp. The biggest-best change was on the island: black plugs for the black background.


Based on a recommendation from wirecutter, we installed the Ultraloq's smartlock. So far, so good! Allows us to set up different codes, and to set them up remotely via wifi.


Minor detail, but upgraded the screws for the hooks in the laundry room (which is acting as the coat closet). (cough, cough) please disregard the shadows...


We did get to spend a few moments having some fun while we were there. We enjoyed the snow and the wacky weather (one day we saw rain, sleet, freezing rain, grapel, snow, and high winds). We saw deer out back and wild horses out and about on the road. Black Bear coffee and Cloudcroft Brewing Company were also fun.